


XPRT is now live on Velodrome on Optimism Mainnet, allowing XPRT holders to seamlessly trade and provide liquidity with XPRT on the Ethereum Superchain scaling solution, which offers lower fees and super-fast transaction times.
The purpose of this tutorial is to guide you through the process of adding liquidity to the XPRT/USDC pool on Velodrome Finance on Optimism.
Adding liquidity to the pool will turn you into a liquidity provider to earn fees from swaps made through the pool, alongside any additional LP rewards. Furthermore, Persistence will be adding additional incentives for LPs on the pool very soon, making it even sweeter to become a liquidity provider.
The Velodrome XPRT/USDC pool is a concentrated liquidity pool. This means that LPs can set a price range within which they want to add liquidity to execute trades. This concentrated liquidity pool is a novel Automated Market Maker (AMM) design that allows for more efficient use of capital.
To complete this tutorial, users will need XPRT on Optimism. XPRT is now live on Optimism, and you can bridge XPRT from Persistence Chain (or any other chain where XPRT is present) to Optimism using Squid Router, with a very minimal fee of ~0.7 XPRT. Previously, we released a tutorial on how to bridge XPRT to Base Chain using Squid Router. If you want to learn how to bridge XPRT to Optimism, follow this guide and substitute any references to the Base Chain for Optimism.
Finally, you will need USDC on Optimism to add liquidity and some ETH on Optimism to pay for transaction fees.
If you have these three assets prepared, we can go ahead and get started with the tutorial!
Connecting Your Wallet to Velodrome Finance
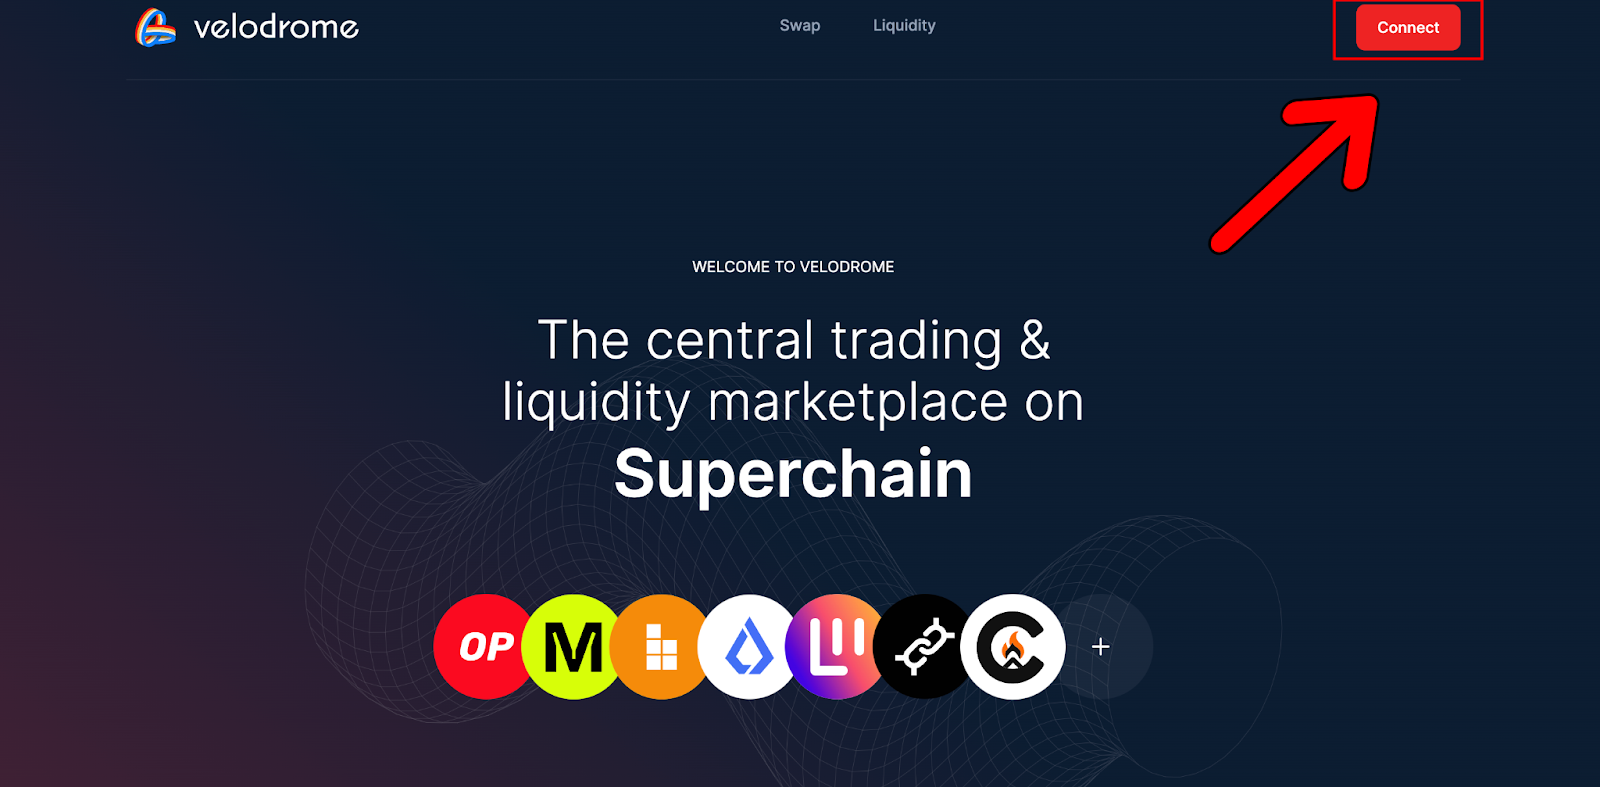
The first step in the entire process is connecting your wallet to the Velodrome Finance platform.
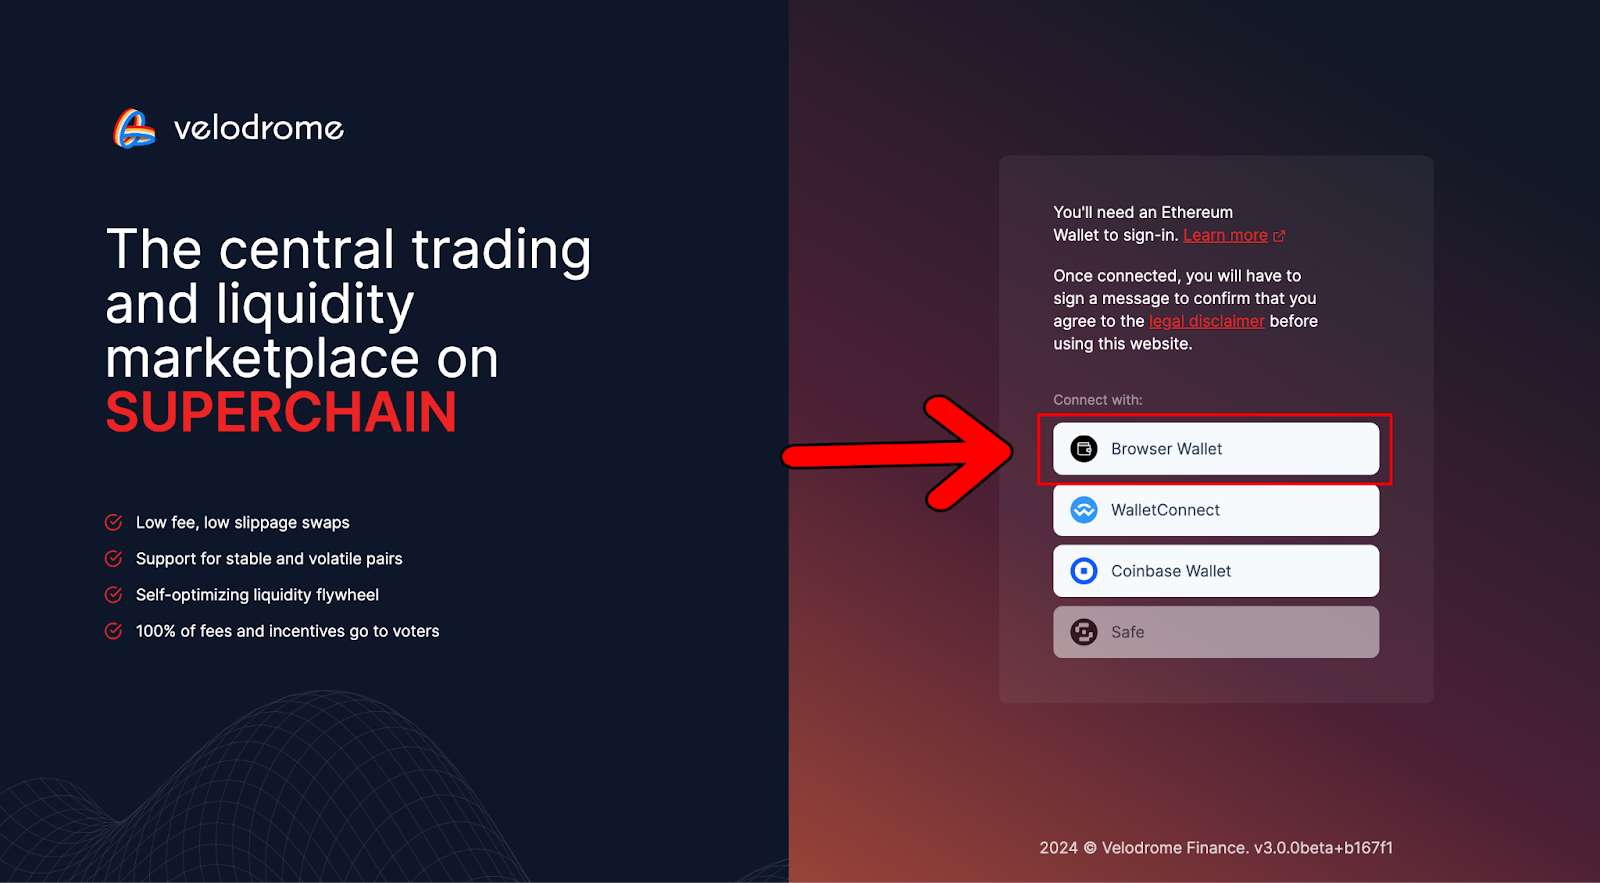
- Navigate to https://velodrome.finance/ and click “Connect”;
- This will bring up the following page requesting that you choose a wallet to connect to Velodrome. For this tutorial, we will be using “Browser Wallet.”
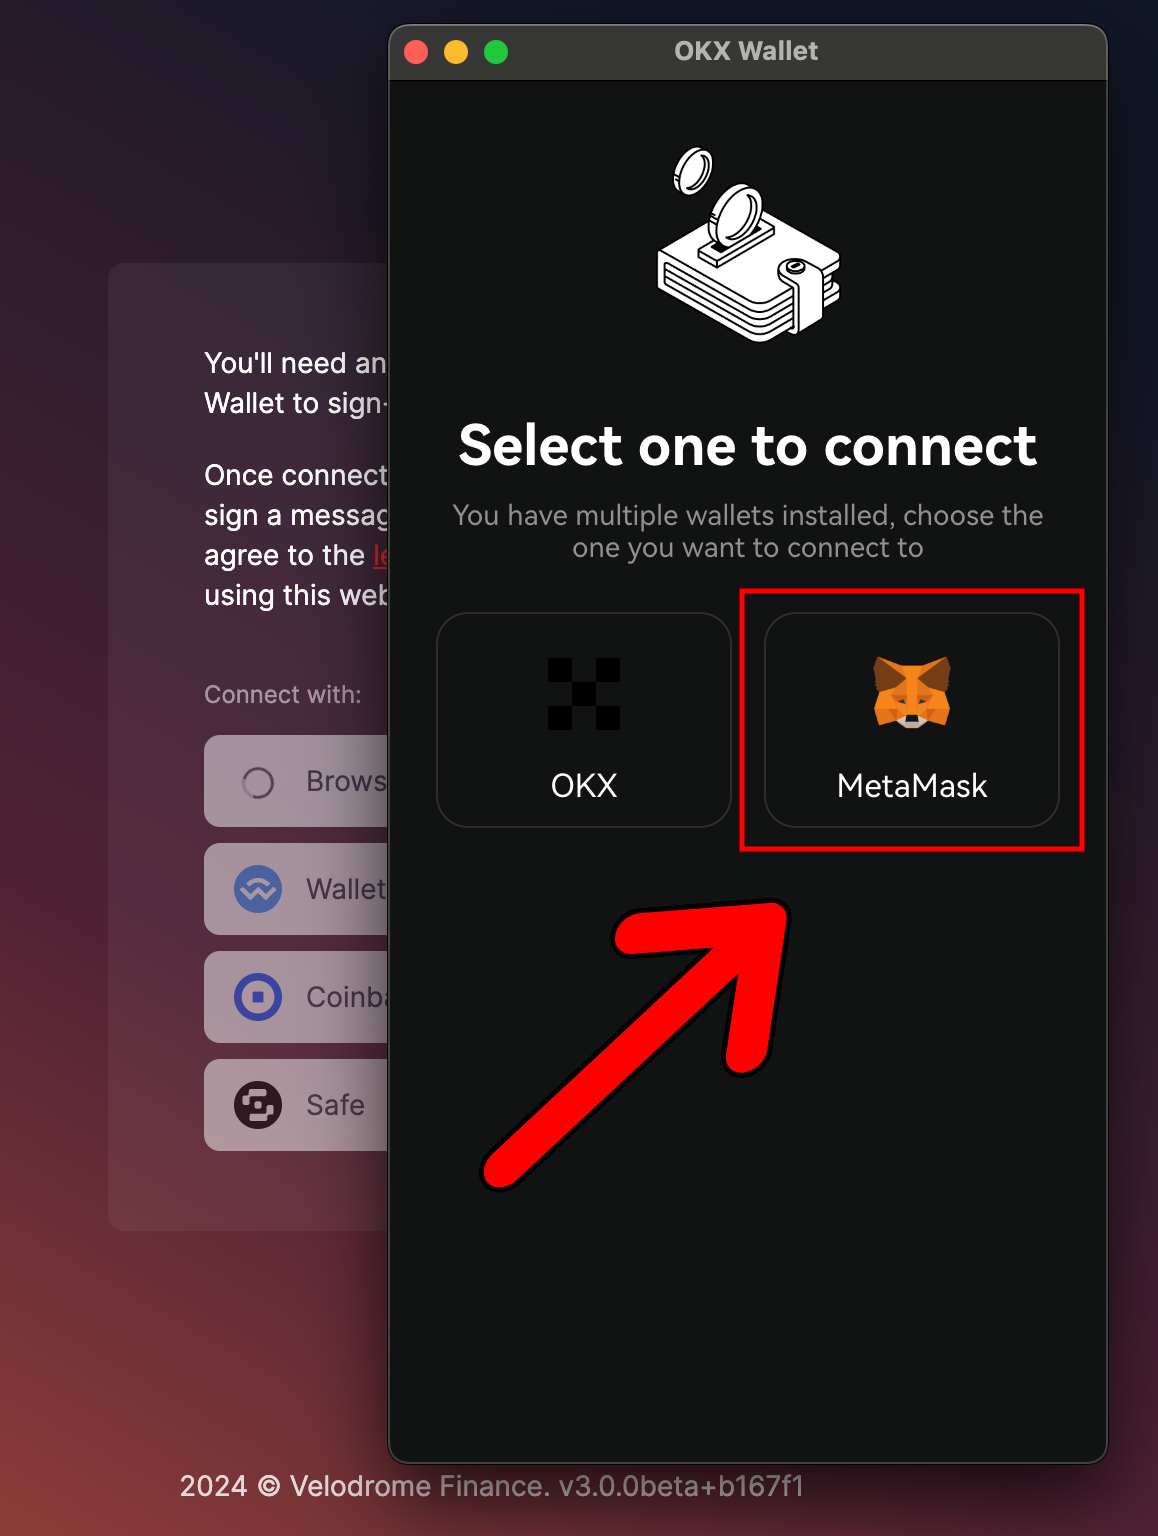
- If you have more than one Browser Wallet installed, a pop-up window will appear, asking you to select which wallet to choose. For this tutorial, we will be using MetaMask, but you can use any wallet of your preference:
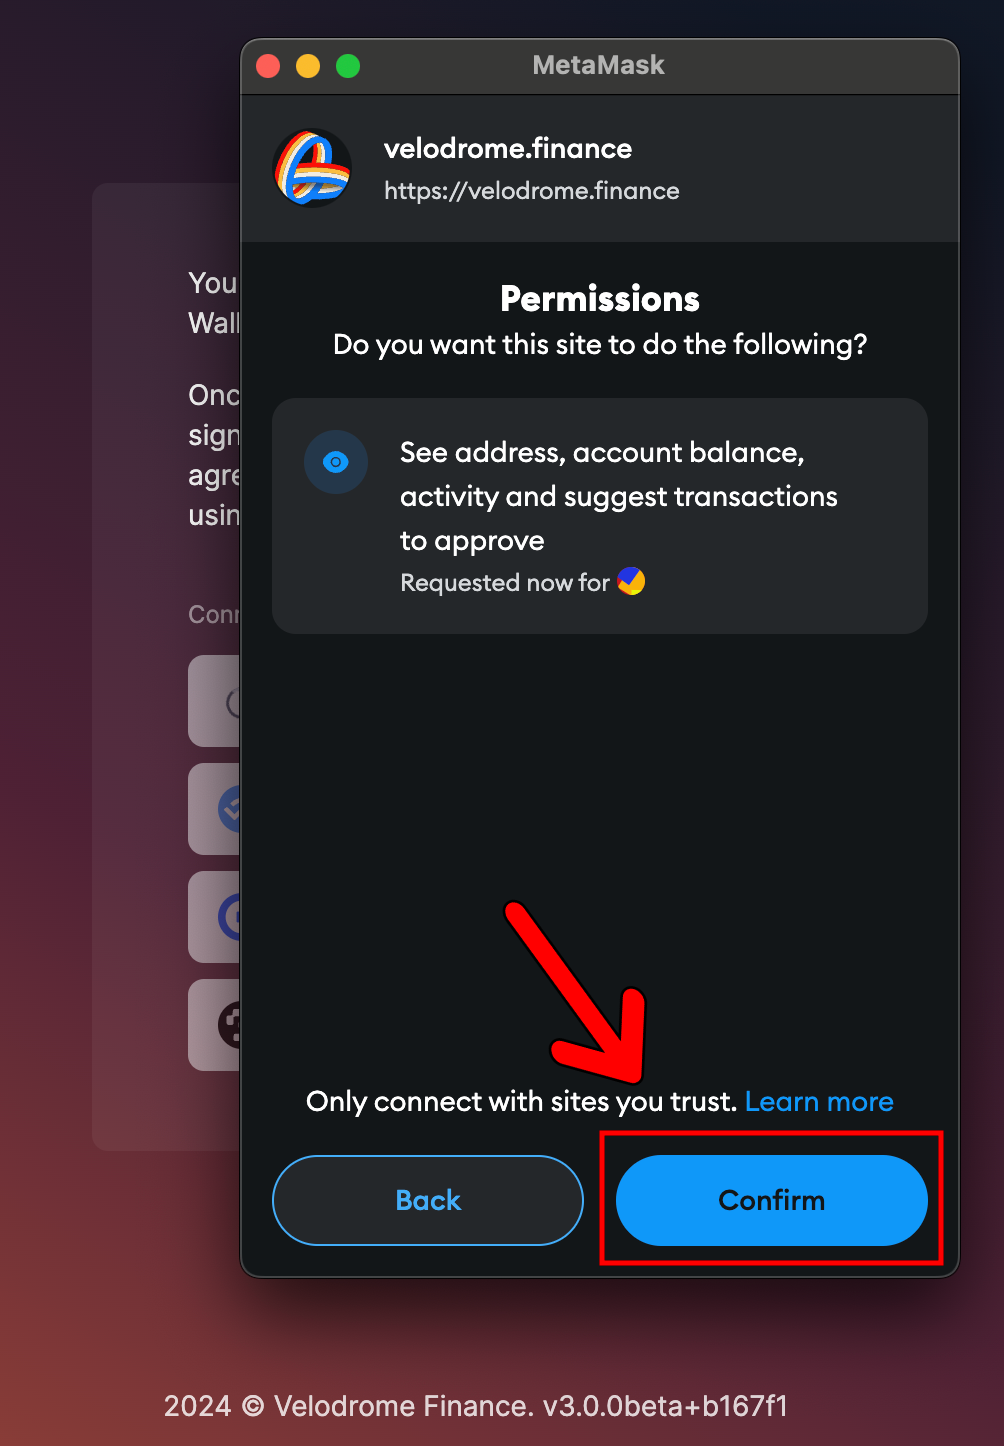
- Select your preferred wallet and hit “Confirm”:
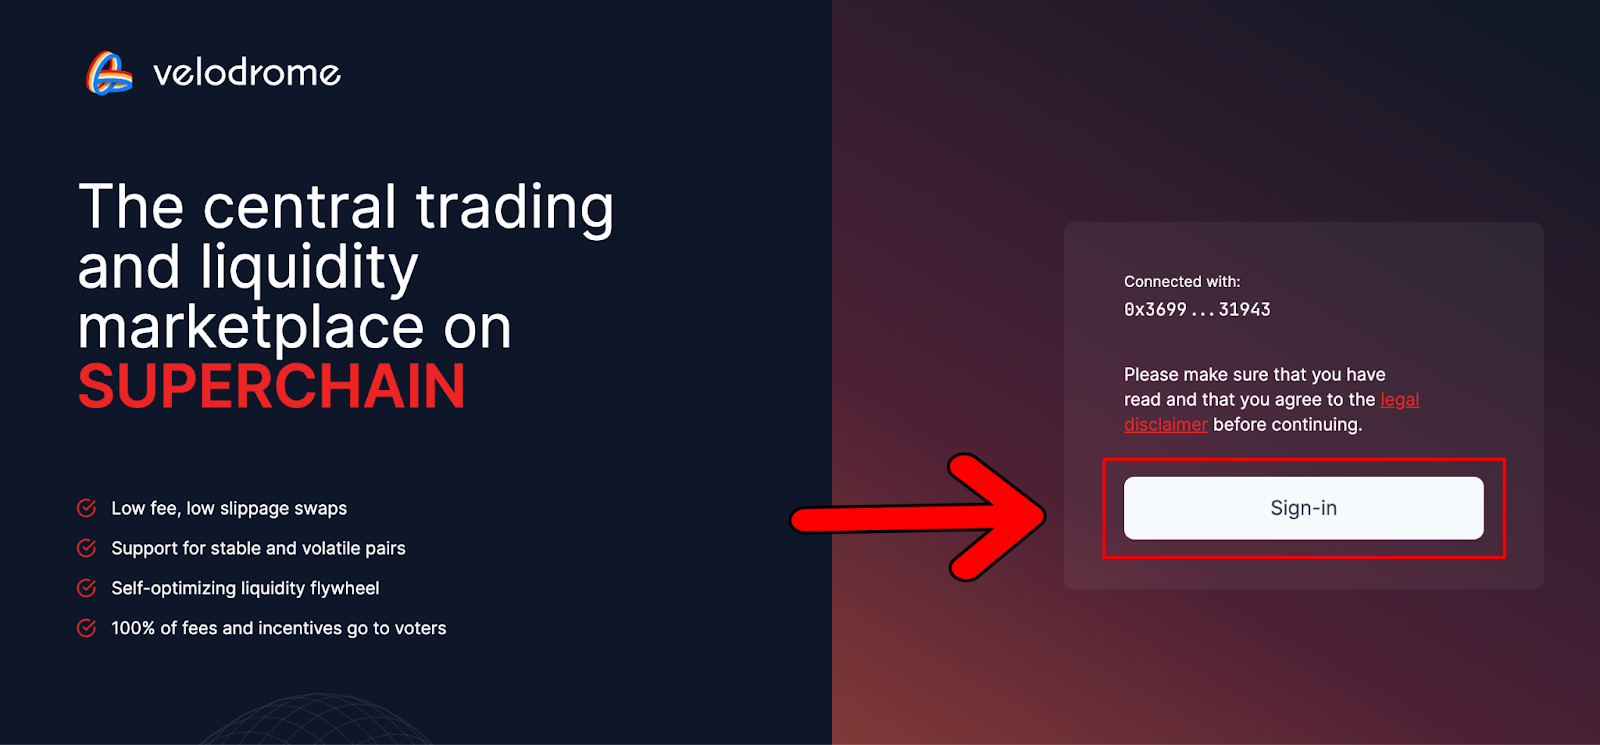
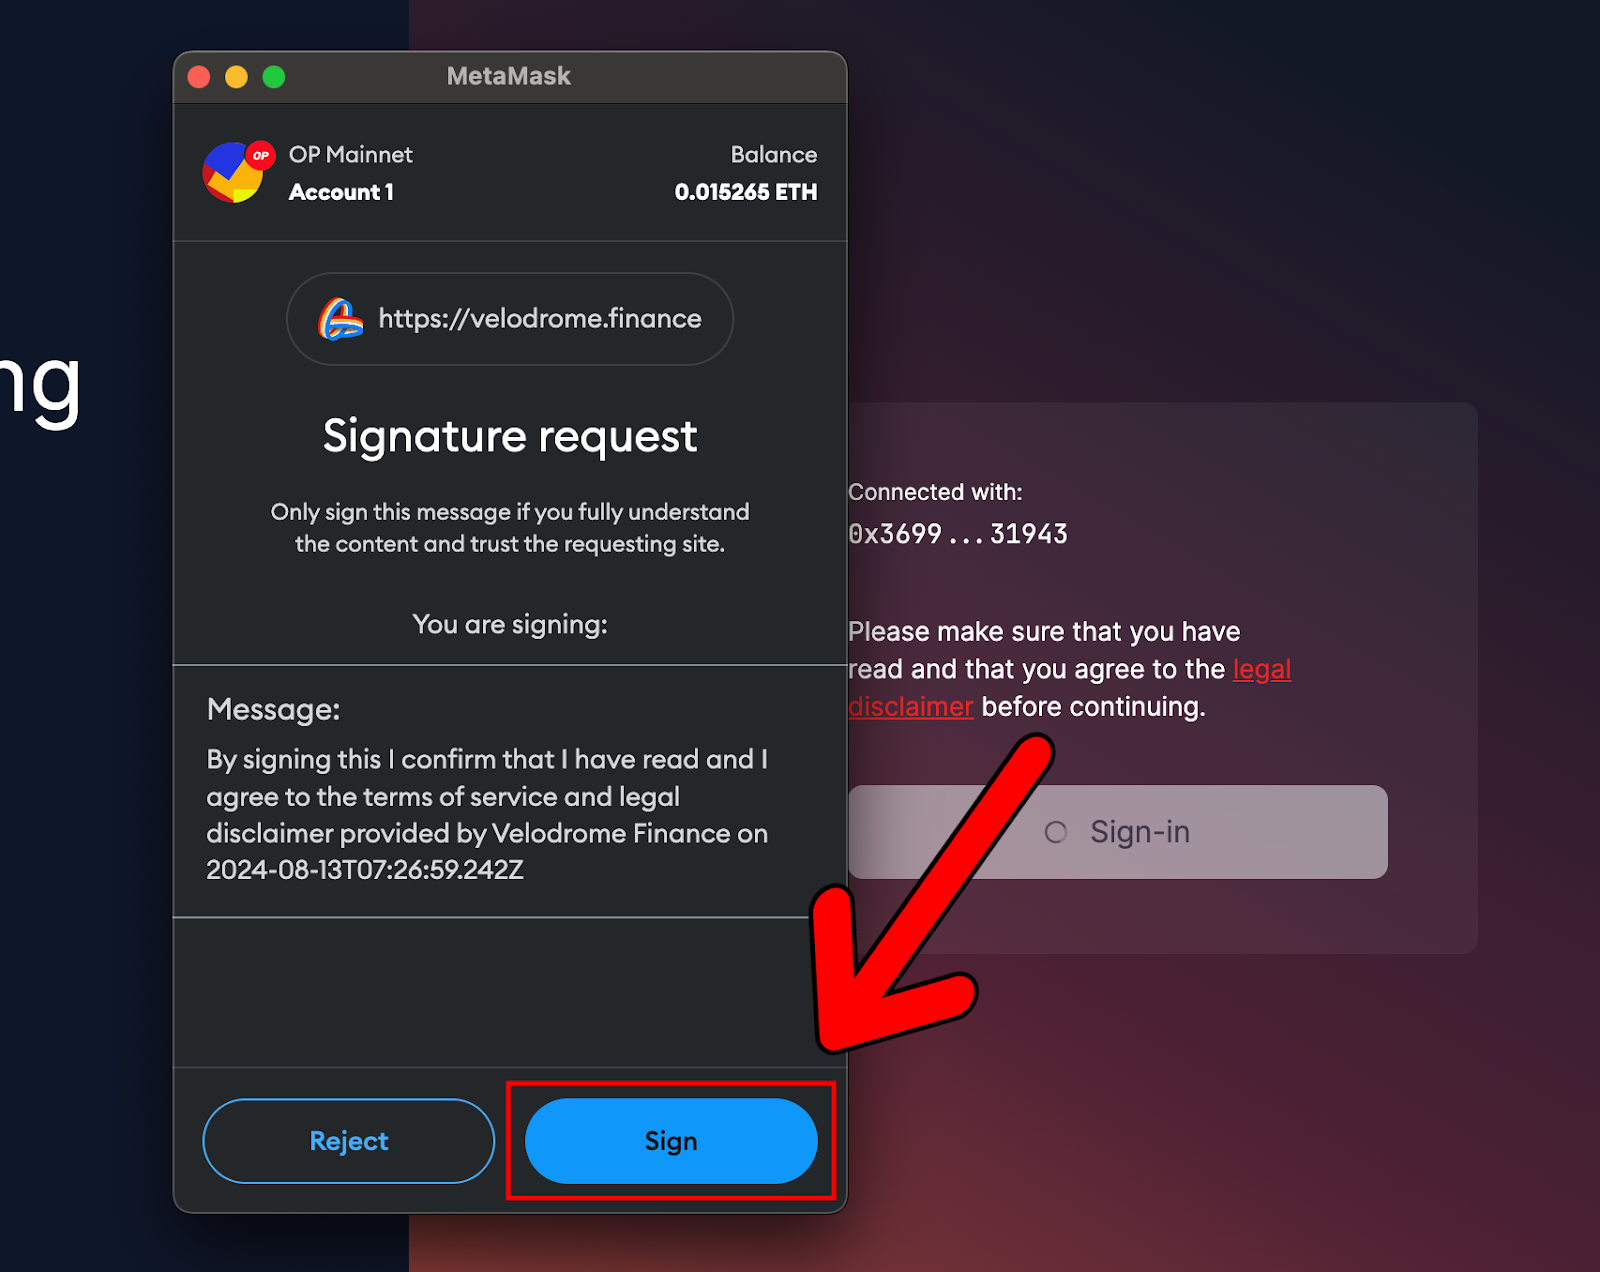
- Once connected, you will be asked to “Sign In” to agree to the legal disclaimer. Hit “Sign-in”:
- A MetaMask wallet notification will appear, asking for a signature request to sign the legal disclaimer. If you’re happy to accept the legal disclaimer, hit “Sign”:
Once signed, you will have officially connected your wallet to Velodrome Finance and can continue to the next step.
Adding Liquidity to the CL200-USDC/XPRT Pool on Velodrome Finance
Now that we have connected our wallets, we can go ahead and add liquidity to the CL200-USDC/XPRT pool on Velodrome Finance.
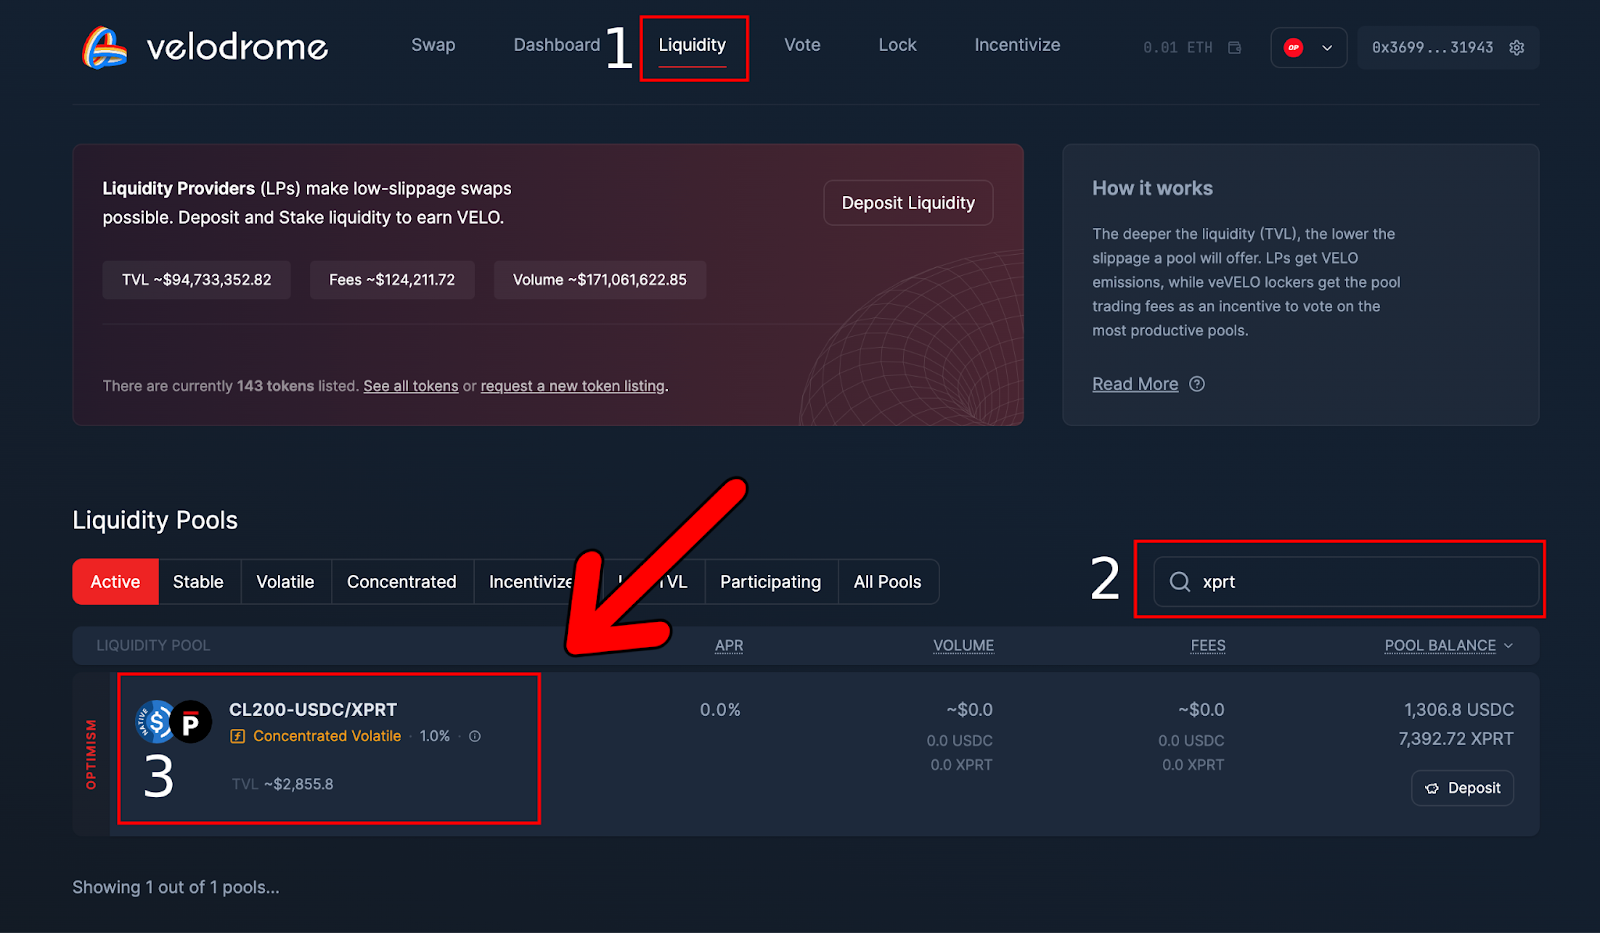
- Here are the first three steps to get started:
- Head over to the Liquidity page,
- Search for XPRT,
- Click the CL200-USDC/XPRT Pool:
- On the next page, click “New Deposit”:
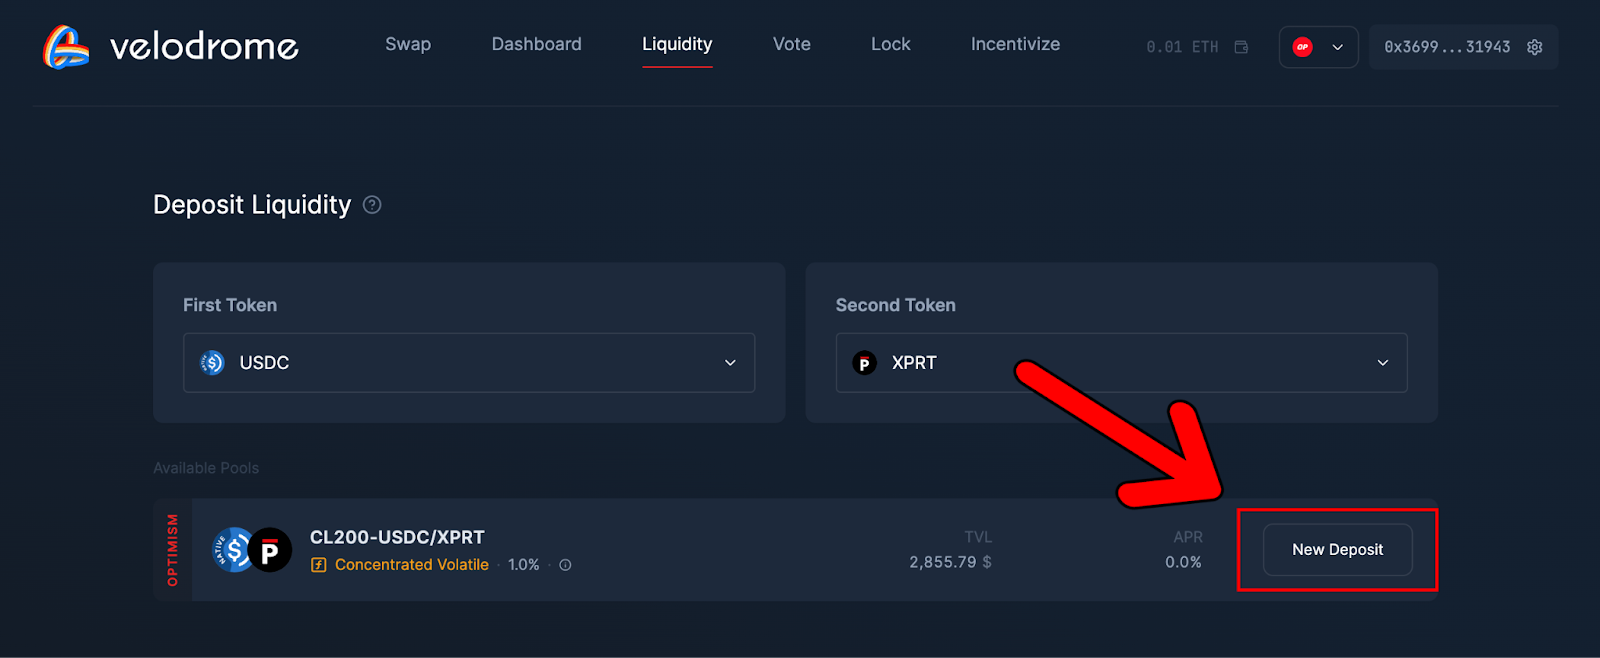
- This will bring up the following dashboard:
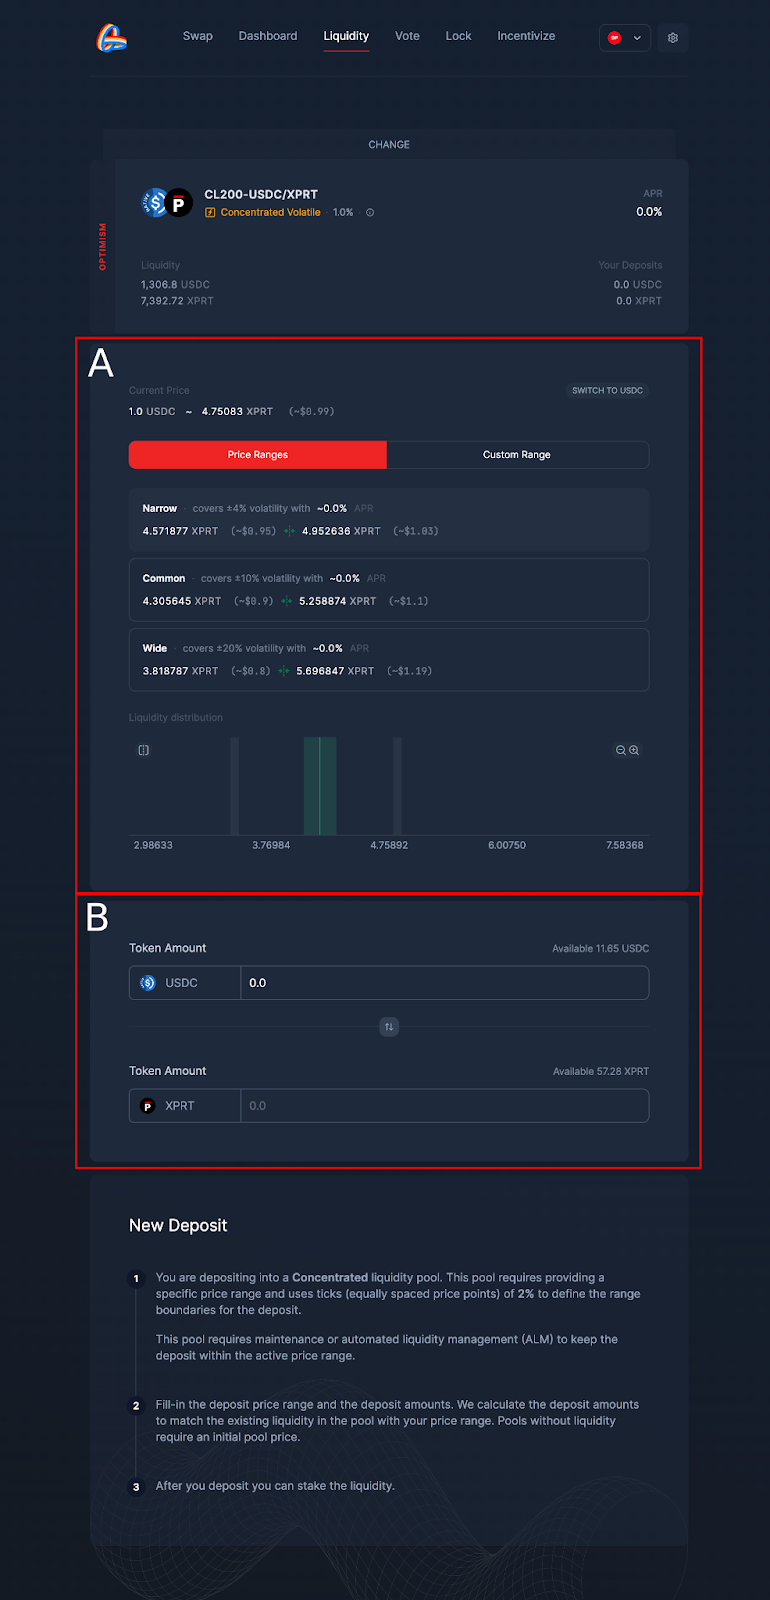
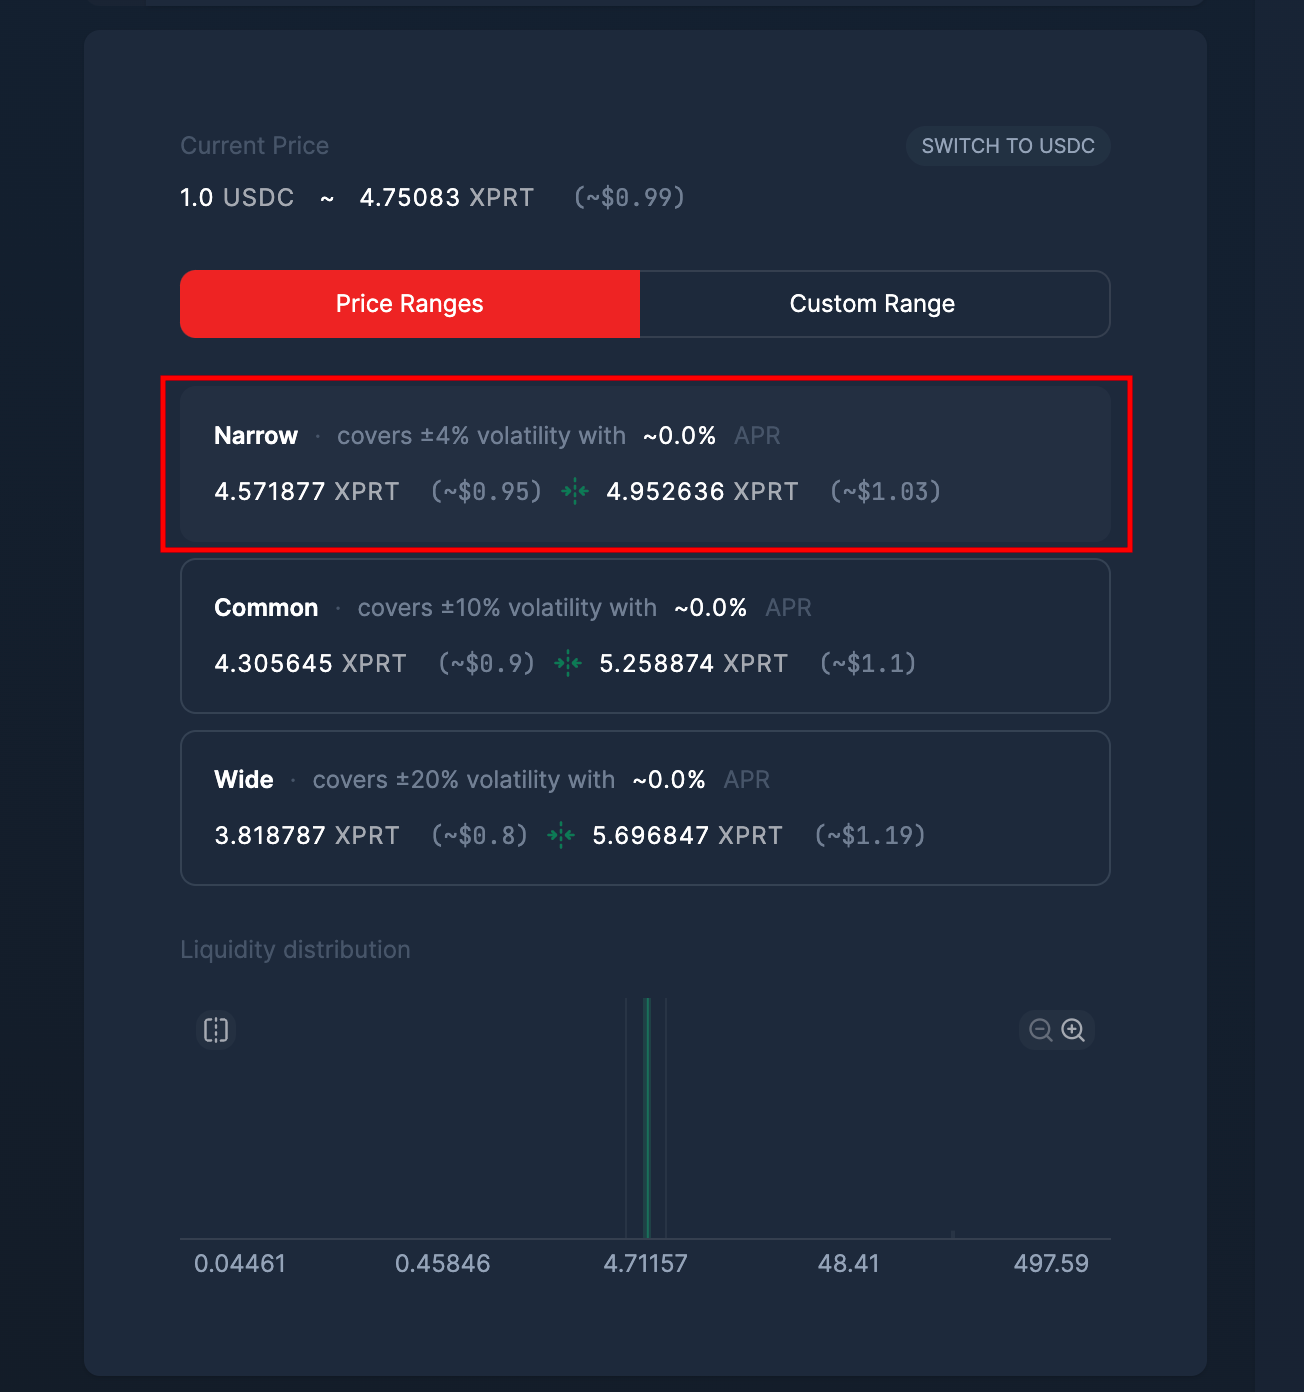
- In the diagram above, Box A allows you to select the XPRT price range within which you’re happy to facilitate a swap. NOTE: You can also utilize the “Switch to USDC” button to set the range in USDC.
- Box B allows you to input the amount of liquidity you wish to add.
- We will stick with the default “Narrow” range for this tutorial. However, if you’re happy to facilitate swaps during periods of volatility, you can select the “Common” or “Wide” options:
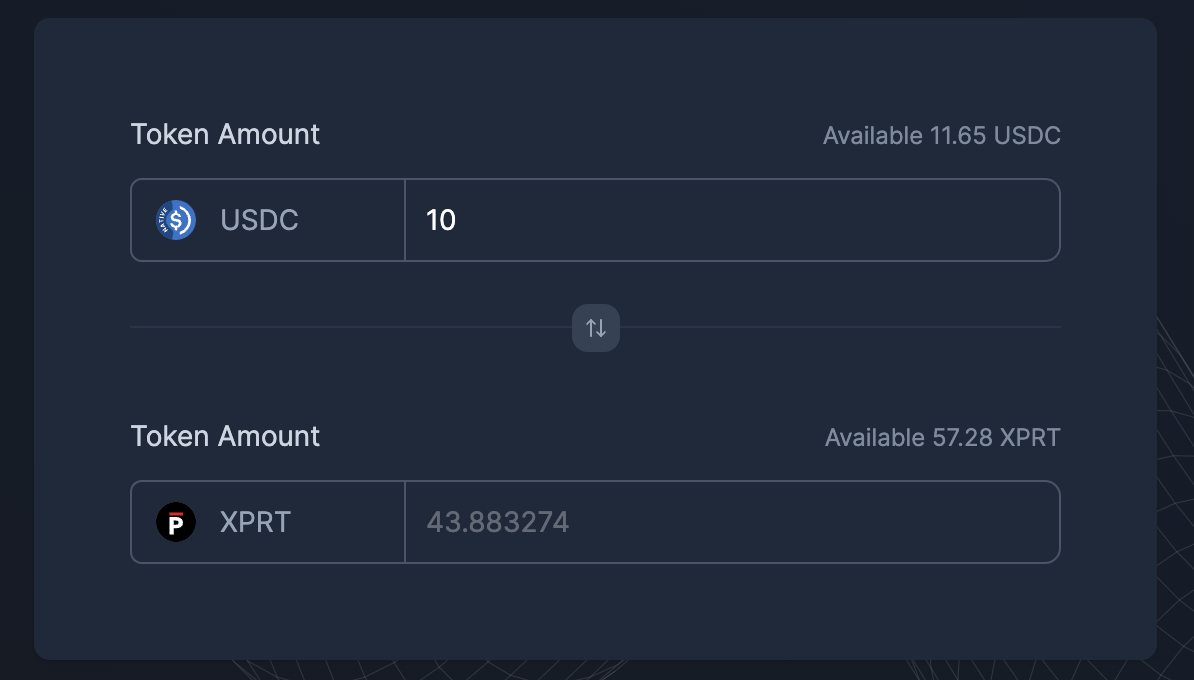
- Next, we can define how much liquidity we would like to add. To add liquidity, simply input an XPRT or USDC amount, and the other field will automatically populate. For this tutorial, we will be adding 10 USDC to the pool. The dashboard auto-populated the equivalent XPRT for us:
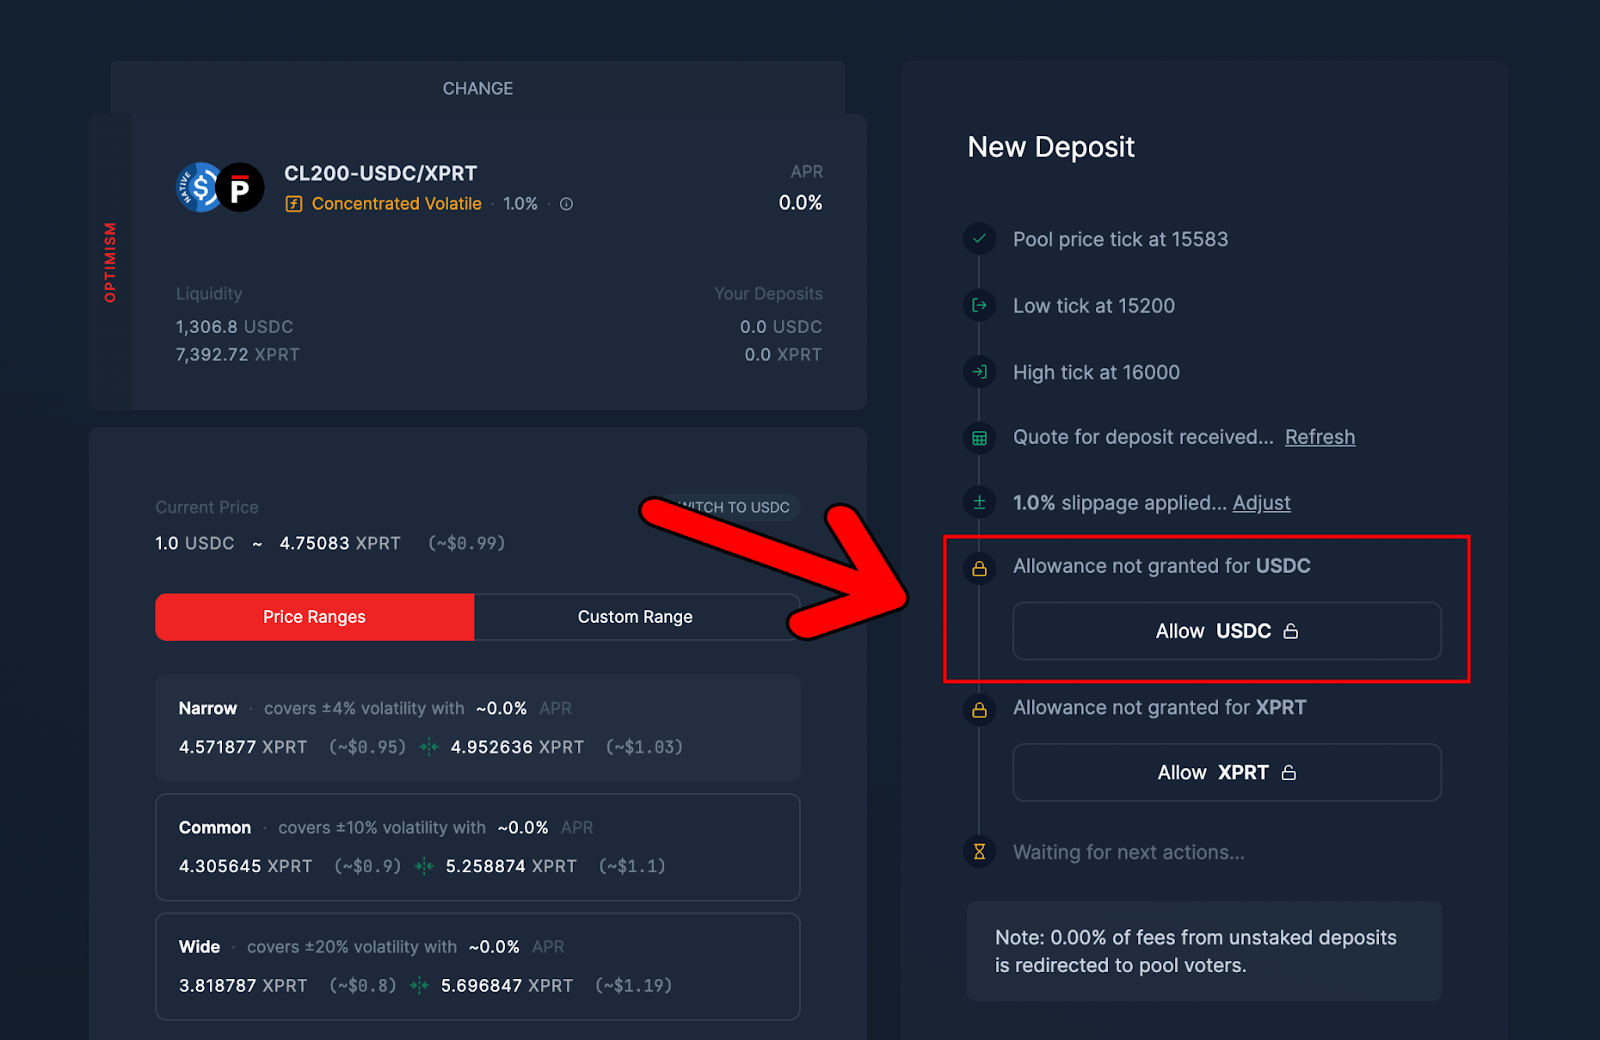
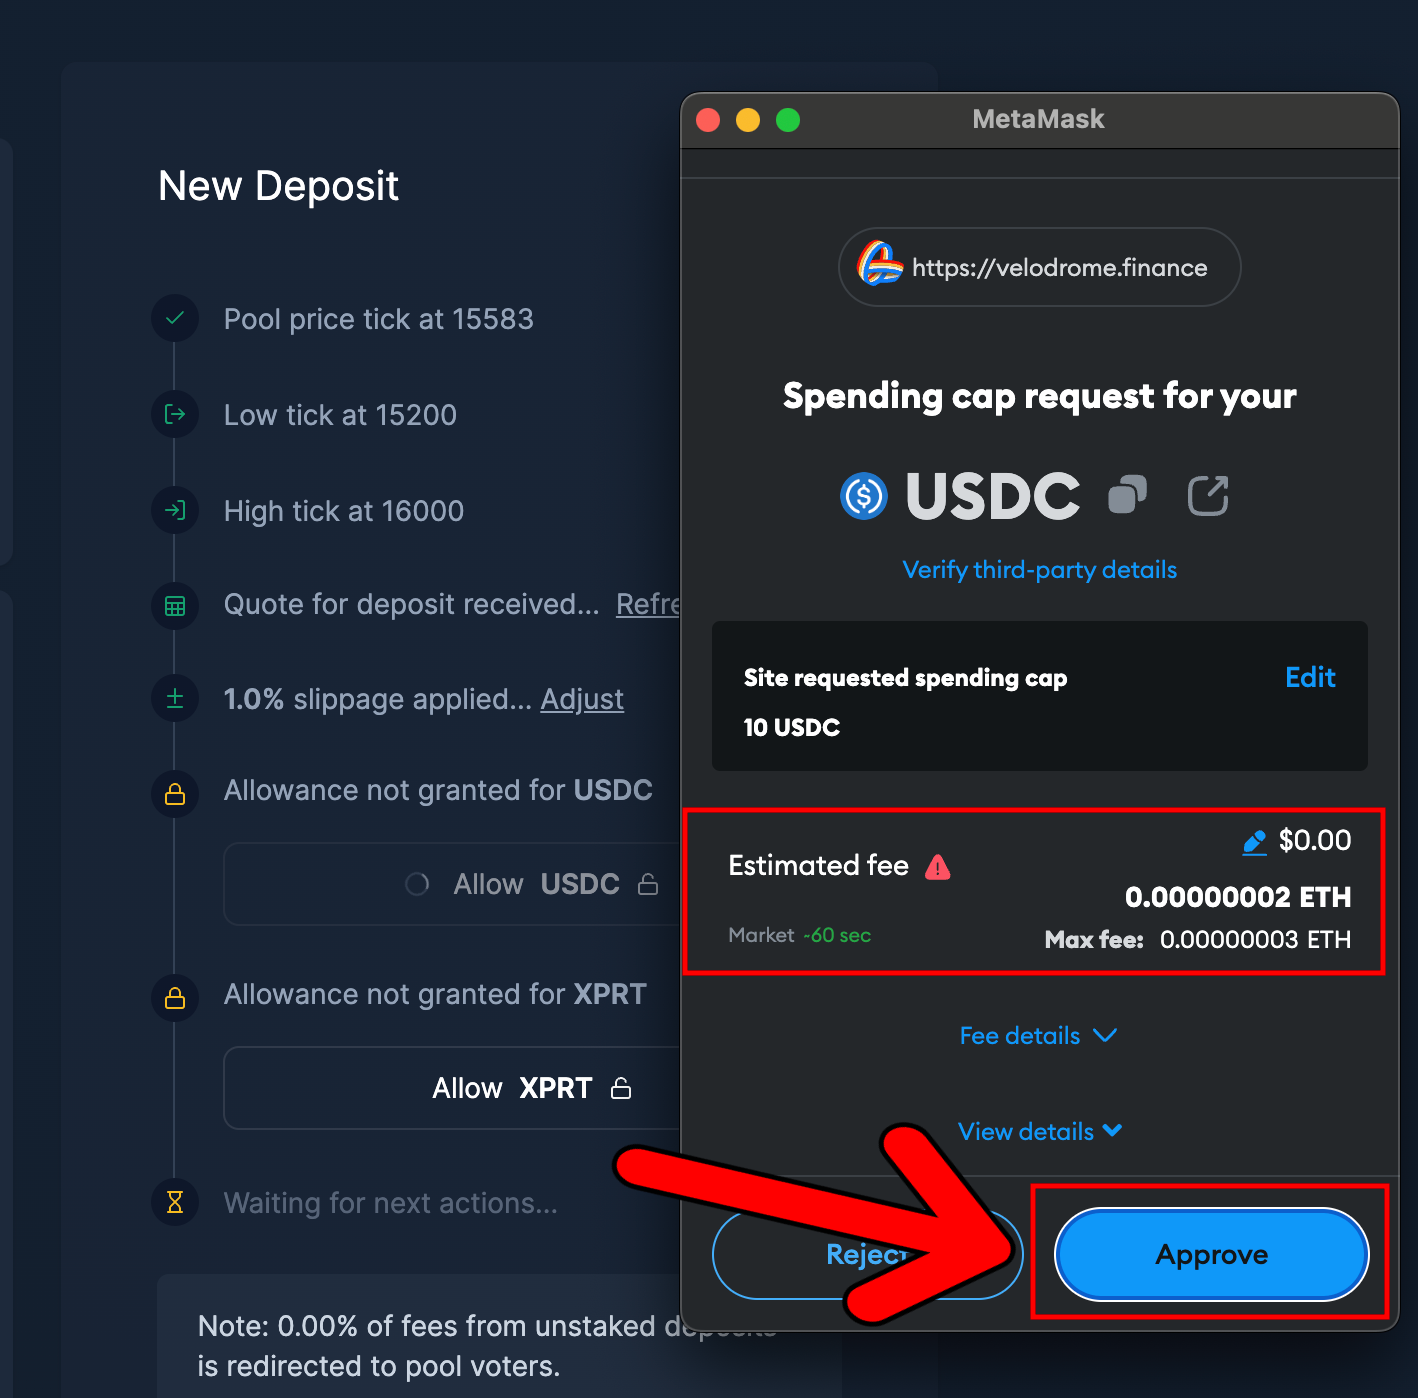
- Next, we need to provide permission for Velodrome to spend USDC to add liquidity to the pool. To do this, click “Allow USDC”:
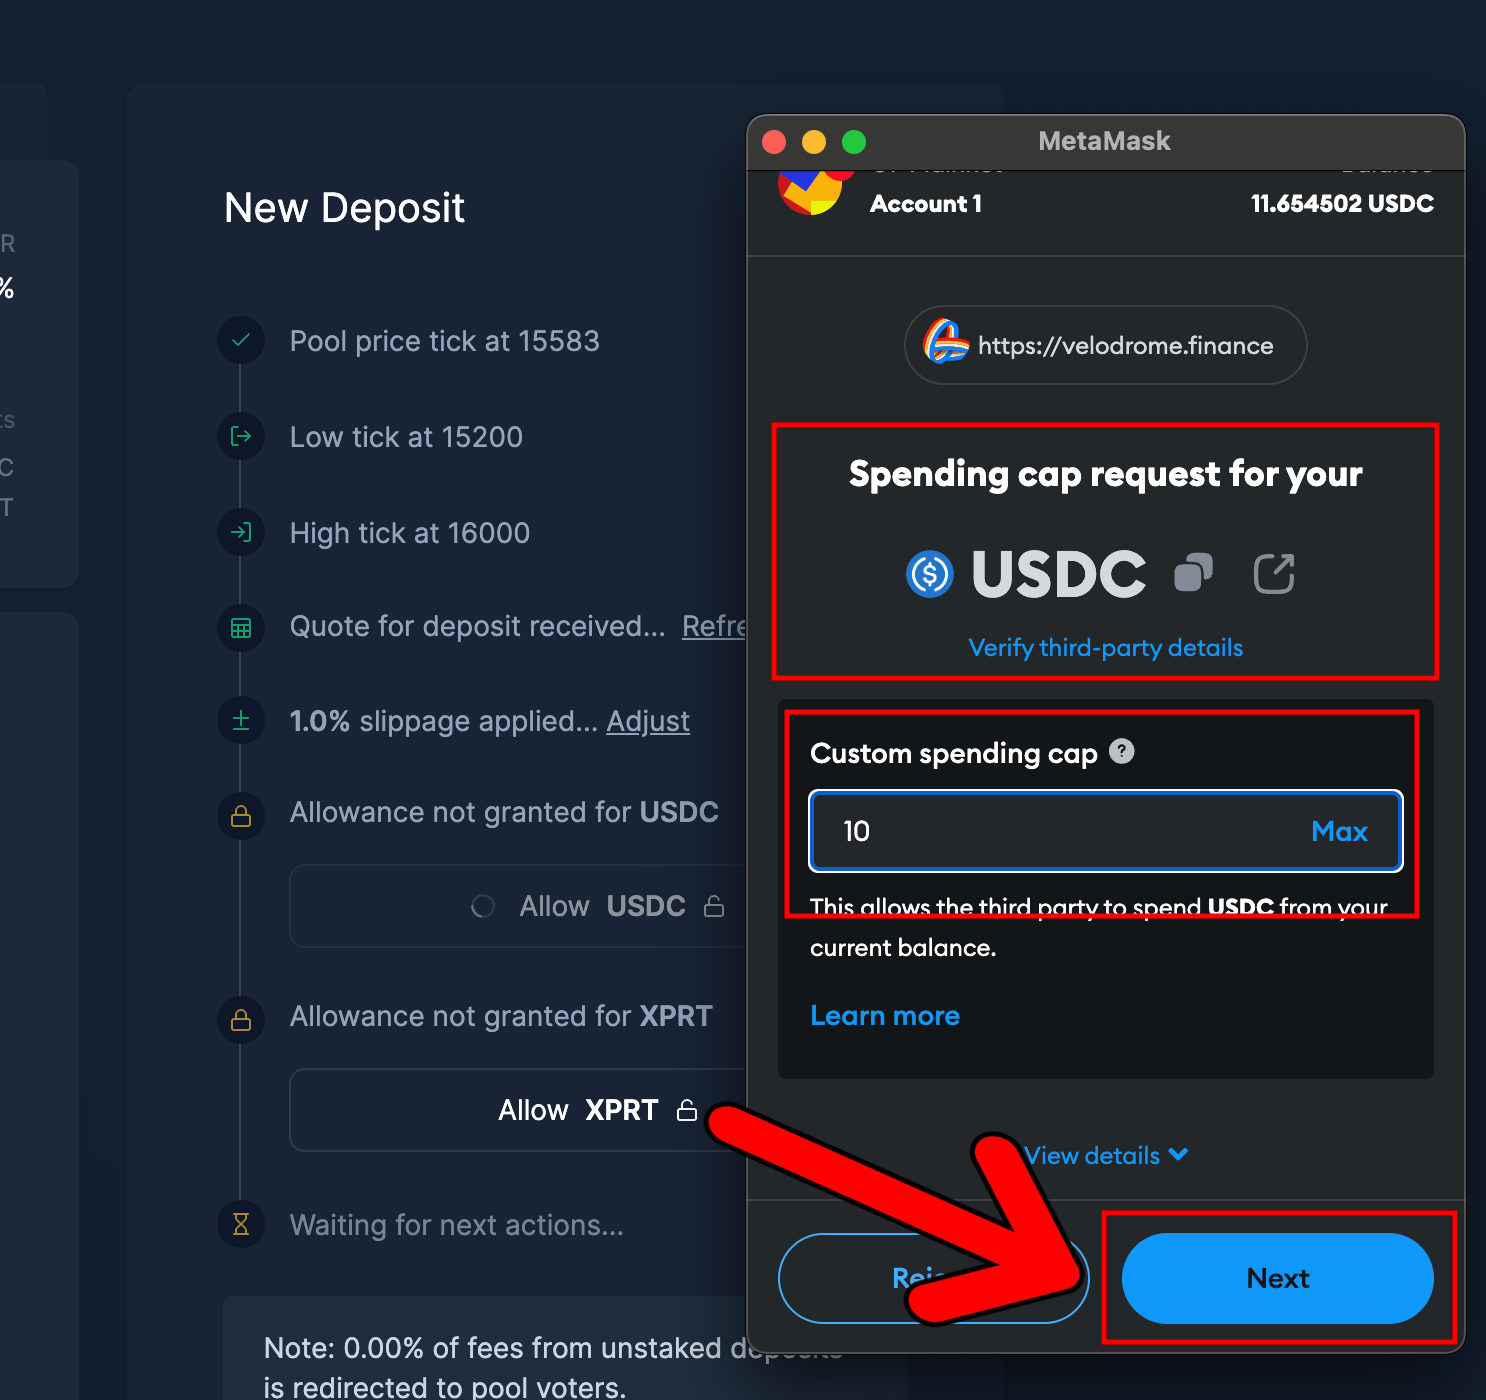
- This will bring up the following MetaMask wallet notification, asking for permission to set the spending cap for you to confirm. Note that the custom spending cap will be automatically populated depending on the liquidity you want to add. Hit “Next”:
- On the following MetaMask notification, hit “Approve.” Note that there will be a small transaction fee to pay here:
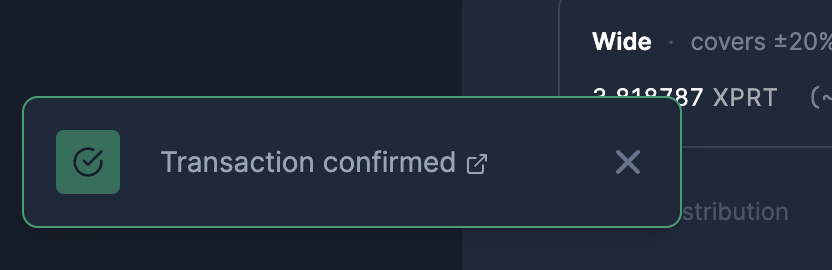
- Once complete, you will notice a little confirmation box appear in the bottom right-hand corner:
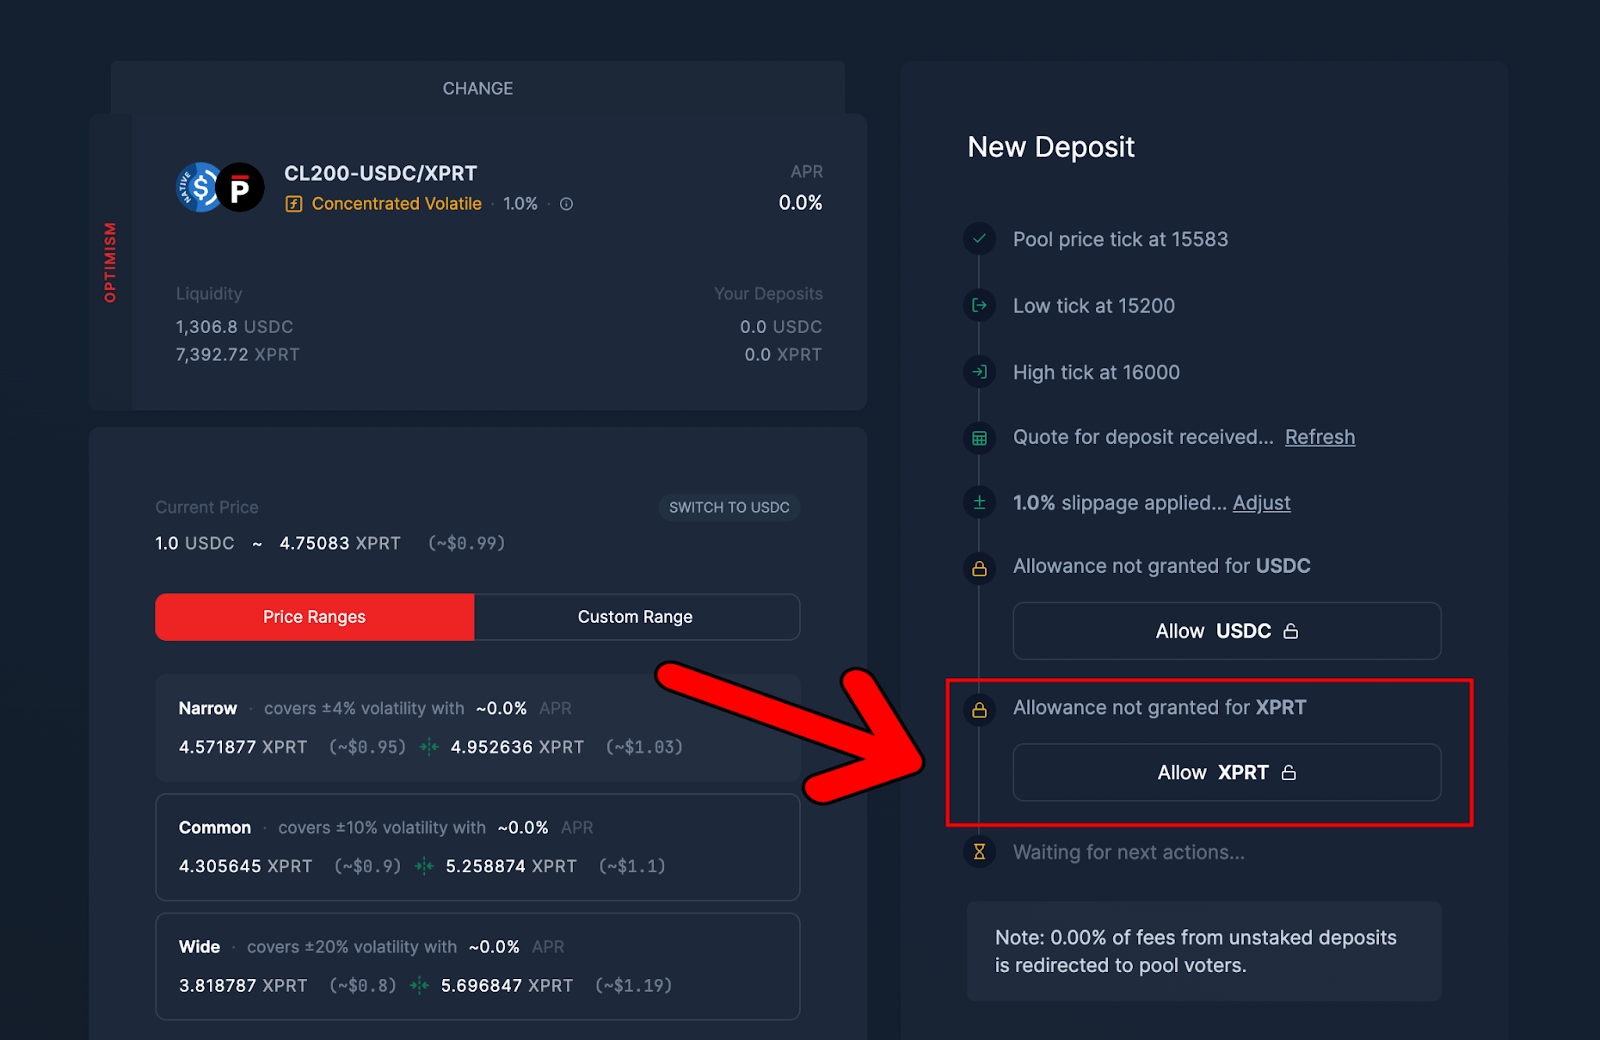
- Next, we must provide the same permission for Velodrome to utilize XPRT. Click “Allow XPRT” and confirm the subsequent wallet notification prompts as we did previously:
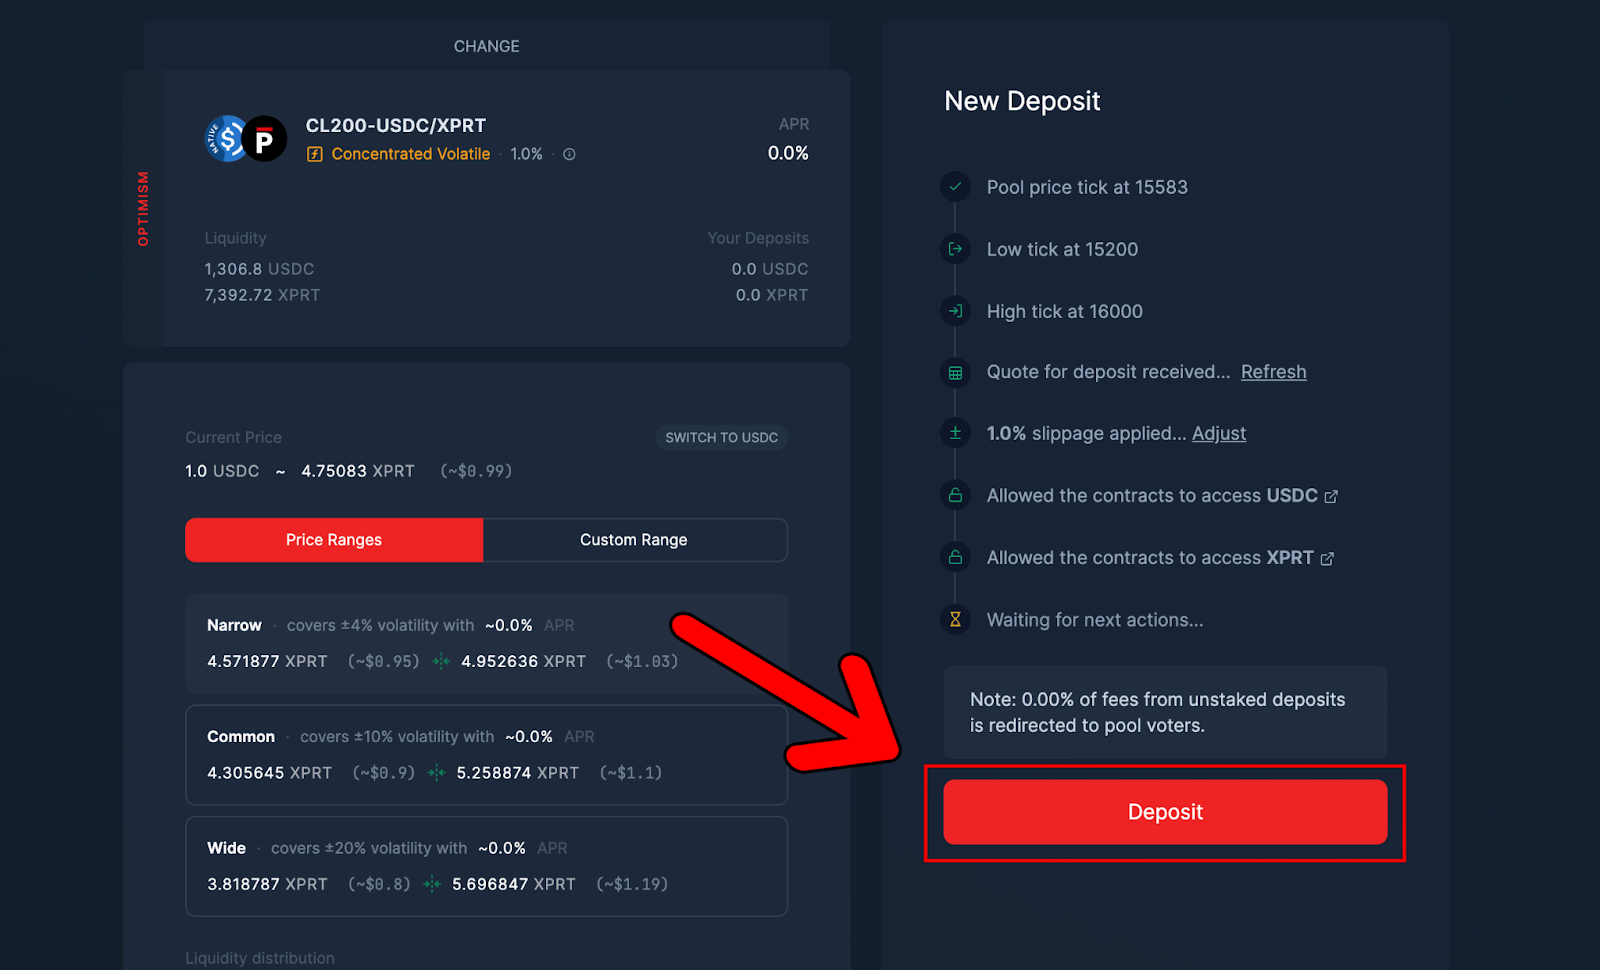
- Once confirmed, we are free to initiate the deposit to add to the liquidity pool. To do this, hit “Deposit”:
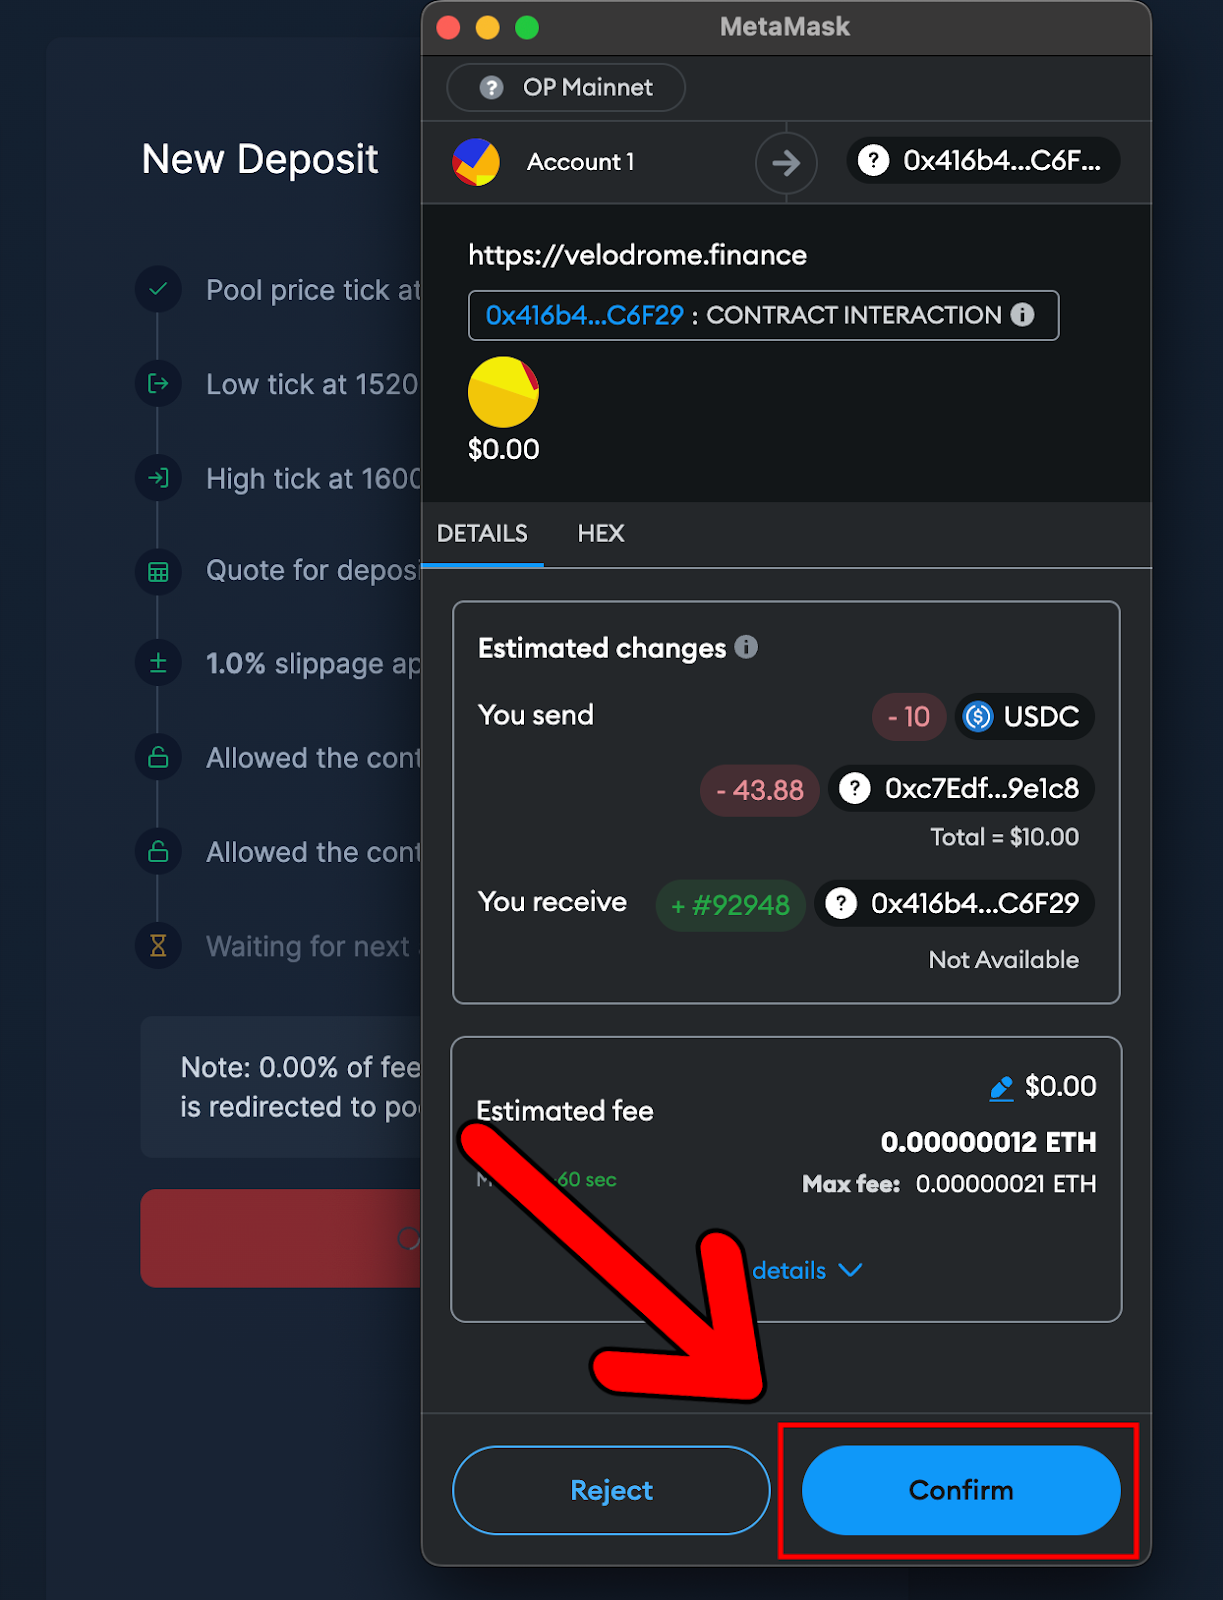
- This will bring up the following MetaMask wallet notification for you to confirm the deposit. Note that there’s another small transaction fee to pay here. If you’re happy to go ahead with the deposit into the liquidity pool, click “Confirm”:
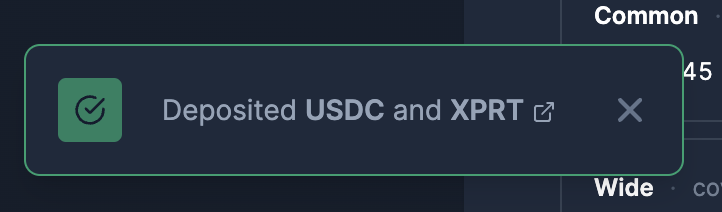
- Once the liquidity has been deposited, you should see the following notification appear:
That’s all there is to it. You’ve now added your USDC and XPRT liquidity into the CL200-USDC/XPRT on Velodrome Finance.
You can double-check your deposit on the “Dashboard” page:
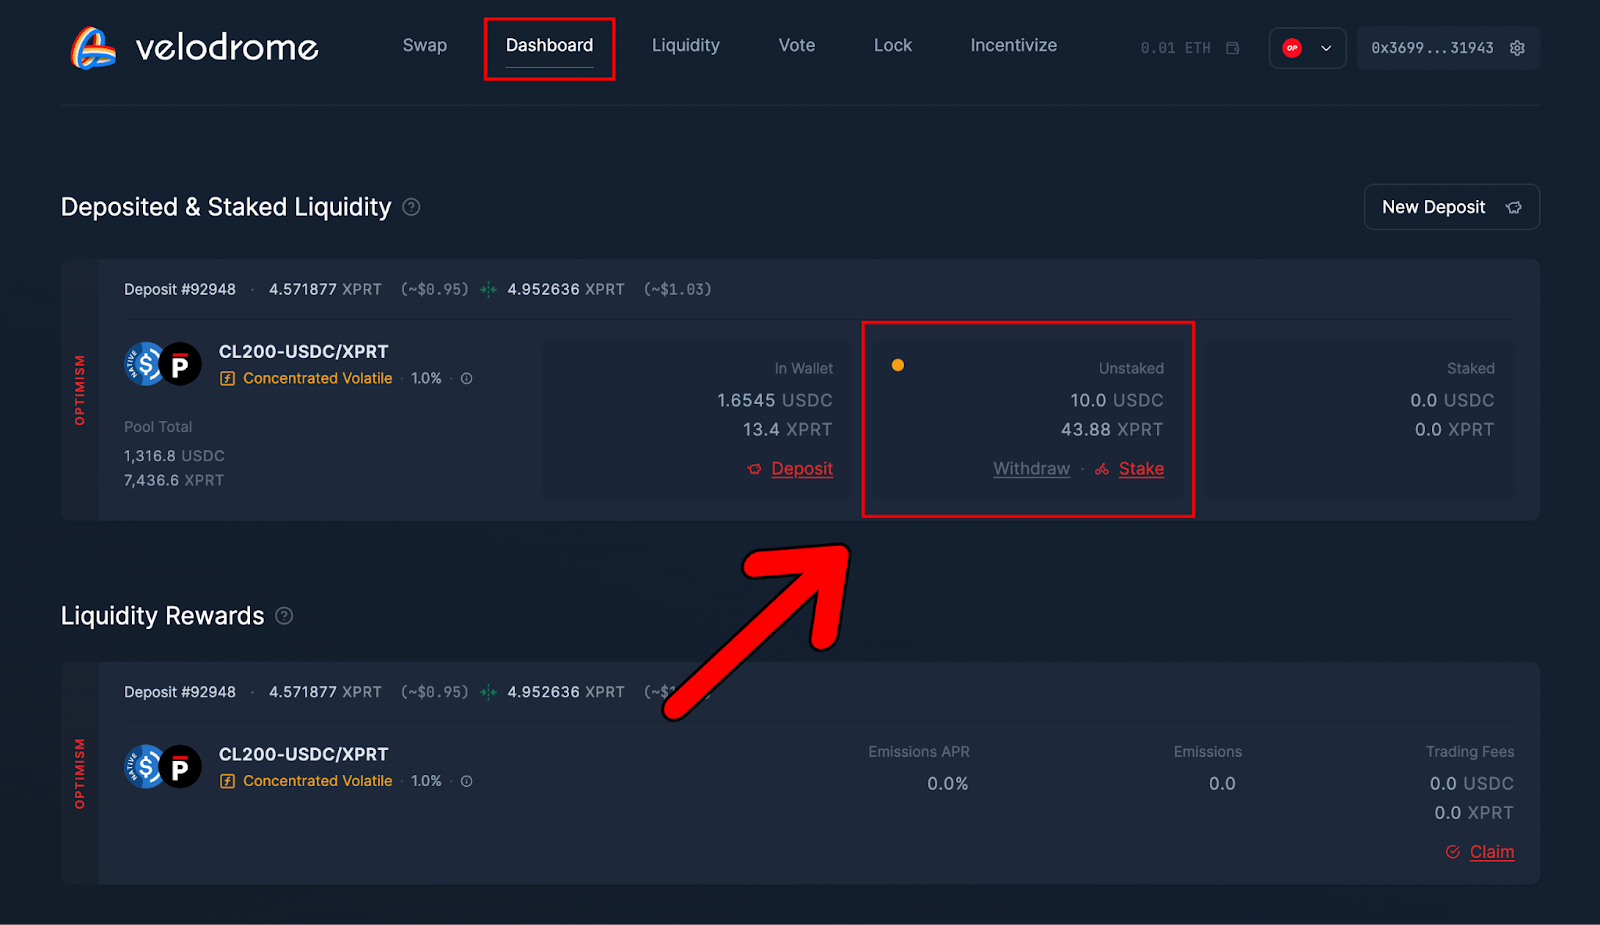
You’re now officially a liquidity provider on Velodrome, allowing you to earn rewards anytime swaps are made through the pool.
About Persistence One
Persistence One is building a Bitcoin interoperability solution to enable cross-chain BTC swaps across Bitcoin Layer 2s.
The rapid rollout of Bitcoin L2s and side chains has led to fragmentation, hurting BTCfi scalability. Using the power of intents, Persistence One will enable users to move assets across Bitcoin Layer 2s more efficiently than traditional bridging, offering fast, secure, zero-slippage cross-chain swaps.
Twitter | LinkedIn | Telegram | YouTube | Reddit | [email protected]